
Creating a Software Defined Datacenter

Planning
The first step to designing a SDDC is to create a networking plan. To do this, we’re going to need to consider some of the following:
- Size of hosted services
- Throughput required
- Potential growth over the next 3 years
- IP Schema
- Routing between physical and logical environments
- Redundancy and fault tolerance
For the purpose of this article, we’re going to build a single-tenant basic consolidated SDDC using VMware vSphere (ESXi and vCenter), vSAN and NSX-T. We’re going to use a basic network topology for a single site.
Don't want to deal with this yourself?
Watch me do IT!
Step 1: The FSN & BSN
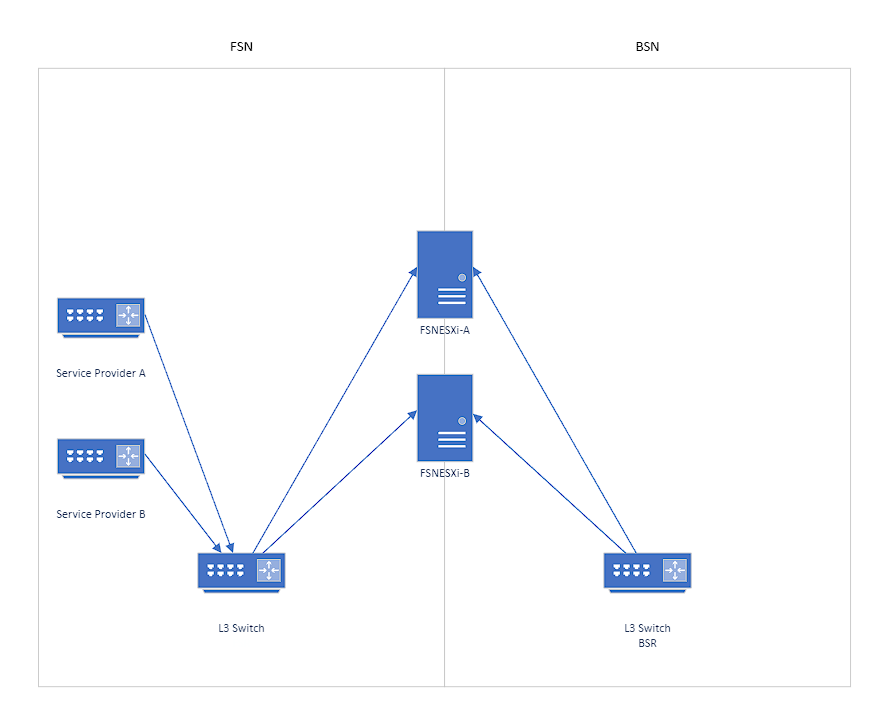
Typically, this would also be known as your DMZ and internal networks. But for our operation, we separate the public and private networks into the Frontend Services Network and Backend Services Network. The FSN contains a pair of ESXi servers or even physical routers that will segregate our internal networks from the public networks. The BSN contains the SDDC private backend networks.
Don’t confuse the BSN for the private networks you utilize for LAN connectivity. That should be separated from the BSN by a route hop. A route hop reduces the risk of a network flood or conflict from the LAN bringing down your datacenter. I didn’t see the need for it at first until it happened to me!
The BSN, in which we will start with will need the following subnets to the right that I’ve allocated for this single-tenant environment. Feel free to use your own schema.
In the diagram below, you will note that there is a L3 router/switch on both of the networks. The subnets we’ve defined for the BSN are assigned to the Backend Services Router or BSR.

BSN Subnets
- Management
- IP: 10.0.1.0/24
- DG: 10.0.1.1
- vMotion
- IP: 10.0.2.0/24
- DG: 10.0.2.1
- vSAN
- IP 10.0.3.0/24
- DG: 10.0.3.1
- Storage (if used in addition to vSAN)
- IP: 10.0.4.0/24
- DG: 10.0.4.1
- GENEVE
- IP: 10.0.5.0/24
- DG: 10.0.5.1
FSN Subnets
- GENEVE
- IP: 10.0.5.0/24
- Public IPs
- IP: 192.168.0.1/24
NOTE: The public IP I’ve indicated is actually a private IP but a Class C subnet. I did not want to advertise a real public subnet on this forum.
Step 2: Redundancy
It would be unwise for me to assume you would see the single routers/switches as a redundant pair, but it must be pointed out that each router/switch is actually an HA/FT pair. So there are two FSRs and two BSRs represented by one control-plane. If you’re using a datacenter-class switch such as Cisco Nexus, it is likely that you can actually have two control planes as they both work independently but utilize FT domains to provide fault tolerance and high availability.
Each network cable plugged into our BSRs and FSRs have at least one cable plugging into each side of each pair. Therefore, at least two cables connect each server to the two BSR routers and two cables connect each server to the two FSR routers. Therefore, you must have at least 2 dual-port 10Gbps network cards for this particular design to work as intended.
Furthermore, you must also configure virtual port-channels (vPC) on the Nexus switches for each server link.
In the DMZ, a pair of ESXi servers will be deployed between the FSN and BSN. Two cables will connect to each FSR and to each ESXi host. The ESXi hosts will also have a pair of uplinks to the BSR as well as the firewalls/routers on the ESXi servers will provide NAT services.
Step 3: Internet Connectivity
For internet connectivity, our current plan is to use the NSX-T firewalls to provide all firewall services for the environment. Therefore, we must create a VLAN for each of our service providers. There is a chance the service provider can only provide one handoff from the service provider equipment/router (SPE). If that is the case, plug one SPE into the FSR-A and the second SPE into FSR-B. That way, if a single switch were to go down, it would only affect one provider instead of both.
If the service provider can handoff two links and/or capable of providing port-channeling, take advantage of the redundancy.
Assign an IP to each VLAN from the service provider’s IP schema. They typically provide a range. Remember, if you have a Nexus like I do, you’ll need 3 IPs just for the vPC.
Step 4: ASN & IP Subnet Procurement
So this will be the hard part, at least for IPv4 it will. If you’re in the United States or North America, you should be able to register for an account with ARIN (American Registry for Internet Numbers) and acquire an ASN number as well as an IPv6 /64 subnet. A /64 is more than enough IP addresses for the size of our environment; and most other environments. It’s also fairly inexpensive to acquire as well.
However, obtaining an IPv4 address involves much more. On September 24th, 2015, ARIN depleted it’s pool of free IPv4 addresses. What this means for us now, we must get an IPv4 range transferred to us via an IPv4 broker. This is kind of a scary world to get into as some who claim to be IP brokers are actually scammers so be careful.
Selecting a broker can be tedious as well as you have to thoroughly vet them before signing their legal documentation. Best bet is to higher an attorney who specializes in this area.
Once you have your IPv4 broker, you can purchase as low as a /24 range which will give you 253 usable IPv4 addresses. You might be thinking you only need 5 or 10, but this is the minimum subnet allowed by ARIN. As of the time of this article, a /24 subnet can go for between $7,000-$10,000.
Once the subnet has been transferred to your account, you may now configure your FSN to utilize this new range and advertise it to your ISPs.

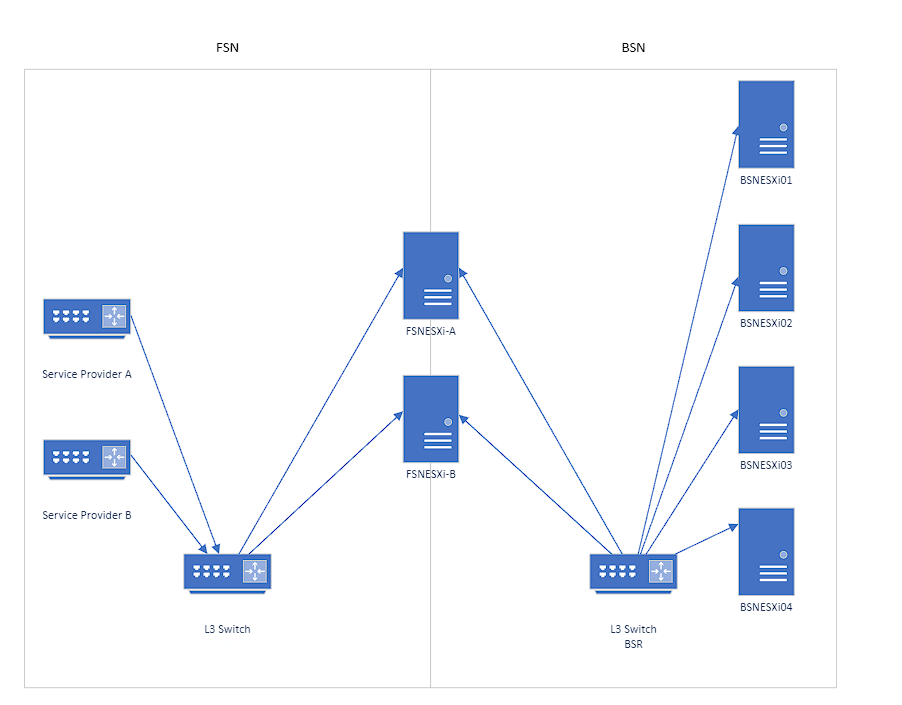
Part 5: Setting up the BSN servers
Now that we have most of our infrastructure planned out, we now need to plan out the sizing of our ESXi hosts for the vSAN cluster. VMware and Microsoft charge a single license for every CPU of up to 16 cores. So if you have a server with 20 physical cores and two processors, you would need 4 licenses for each server.
So for our sake, we’re going to get a Intel 5218 with 16 physical cores and two processors which will consume 2 licenses of ESXi and Windows Datacenter edition. We’ll also need licenses for vSAN and NSX. For our cluster, I’m using vSAN Enterprise and since our NSX environment will be our only firewall, we’ll be utilizing NSX-T Enterprise Plus with Advanced Malware Protection.
The cluster can be a minimum of 3 hosts for the vSAN to work, but it’ll be hard to put one into maintenance mode if you do so we’re going with 4 hosts so we will be N+1. Each host we use will hold up to 768 GBs of RAM and 36x 2.5″ drives. For now, we will only populate the server with 2 BOSS cards (M.2 Boot Optimized Server Storage) for the OS as a RAID1. This won’t consume any of the front drive spaces.
For the front, we will fill slots 1 and 19 with a 1TB SSD for cache disks and slots 2-3 and 20-21 with 3.86TB SSDs. Use SEDs if you don’t want to utilize vSAN encryption; but don’t forget the key manager for it.
Lastly, the hosts will have at least 2x 10Gbps NICs (preferably fiber optic) with each connected to each BSR.
Hardware
- 2x Intel 5218 16 core processors
- 768 GB RAM
- 2x 1TB SSD (SATA or SAS)
- 4x 3.8TB SSD (SATA or SAS)
- 2x 10Gbps NICs
Software/Licensing
- 2x VMware vSphere ESXi Enterprise Plus
- 2x Microsoft Windows Server Datacenter Edition
- 2x VMware NSX-T Enterprise Plus with Advanced Malware Protection
- 2x VMware vSAN Enterprise
Any other licensing needed will depend on the purpose of your cluster.
Note: This total represents what is needed for each host in your cluster. Multiply these numbers by the number of hosts you plan to procure.
Note: Keep in mind, you will also need 2 times each of these licenses for the FSN servers except for the Microsoft licenses.
Conclusion
By the end of this planning and design phase, we have identified the following deliverables:
- Front-end Services Network & Back-end Services Network IP Schema and Equipment
- Redundancy plans & fault tolerance technologies
- Internet connectivity strategy for FSN
- Procurement & assignment of ASN and IP resources by ARIN
- IP brokerages to obtain IPv4 subnets and cost to procure
- Hardware and Software needs
- FSN: 2 Servers
- 2x Intel 5218 16 Core Processors each
- 64 GB RAM
- 2x 1TB SSD RAID1
- 4 NIC slots (2 FSN; 2 BSN)
- BSN: 4 Servers
- 2x Intel 5218 16 Core Processors each
- 768 GB RAM
- 2x 1TB M.2 BOSS RAID1
- 2x 1TB SAS SSD JBOD
- 4x 3.8 TB SAS SSD JBOD
- 2 NIC slots (BSN only)
- Licensing
- 12x VMware ESXi Enterprise Plus
- 1x vCenter Standard
- 12x NSX-T Enterprise Plus with Advanced Malware Protection
- 12x VMware vSAN Enterprise
- 8x Microsoft Windows Datacenter
- Networking
- BSN: 2x Cisco Nexus 9k
- FSN: 2x Cisco Nexus 9k
- FSN: 2 Servers
- Internet Service Providers
Subscribe for new articles
In our next article and video, we will discuss what happens after we install the vSphere, NSX and vSAN software as well as Microsoft Windows AD servers. We will discuss how to design and plan for the NSX environment to provide services between the Internet to the Internal segments.
 No products in the cart.